Zentangle art process step-by-step (Tips and timelapse process video)
This post is mostly a sneek-peek into the whole process of making a zentangle art using one example. From thinking about ideas, looking for inspiration to execution of idea and experimenting. If you are in a hurry, just check out this quick process video.
First step is, Idea!!!
I get ideas at random times but when I actually want to draw, I go blank. That's why it's always good to note down these ideas in a book or notes app on your phone. For this blogpost I wanted to try out a simple zentangle art and make the best use of patterns I have created.
The idea/theme is - Summer. Note down all the things that comes to your mind when you think of summer. Like Ice-cream, cool drink, shades, beach, sun, watermelon etc. Now from these ideas, start selecting the ones that you think you can draw in the zentangle artform. Beach for example is difficult to implement using zentangle art, so eliminate that. Once you have selected an idea, try improvising.
(I am trying to make a simple cool drink/milkshake bottle zentangle art.)
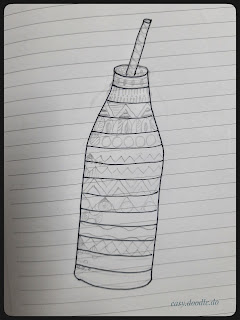
Next step after deciding on an idea is outline. This is a simple bottle outline which I have used. In case of ice-cream zentangle art, you can draw a cone or a cup for ice-cream. If you are trying some complicated design, you can always use internet for outline references.
After drawing outline it's time for making sections. I usually make sections based on the number of patterns I have, also in this case it's a small bottle so approximately 10-12 small sections.
Next step is filling these sections with patterns. To avoid any mishap, I select and draw patterns beforehand using pencil instead of directly drawing with a black pen. It gives me a vague idea of the end design. So, if I don't like how the end design looks, I can make changes.
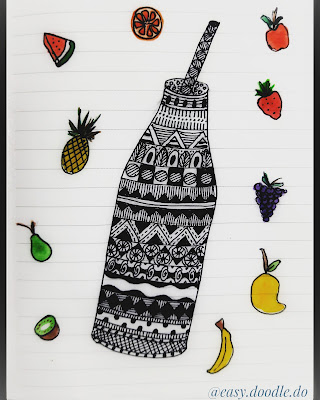
This is the finished zentangle art.
If you are interested you can experiment with different mediums to make your artwork more creative and colorful.
I tried to experiment with some doodle art. Since it's a milkshake/cool drink bottle, I doodled fruits around it. You can try other things, like using funny puns or quotes.
(TIP: Always click pictures before adding something or experimenting. Just in case it doesn't turn out like you imagined)


Comments
Post a Comment